Prospecting & Detecting
A Few Methods for Sampling Hardrock Deposits
June 2014 by Alex Dolbeare
 Early in life, I was fortunate enough to have a friend who was a geologist, with a mindset for prospecting, who was willing to show me some of the basics of sampling in the field. This sampling, and later assays or analysis, would give an estimated value to a given ore deposit or vein. Just as it was to the prospectors of old, sampling is important, but sampling today is a bit more methodical.
I remember reading about improper assays and sampling methods of prospectors from the past in Mark Twain’s Roughing It. This book depicts some of Twain’s wild adventures while prospecting in Nevada and California. Twain described how miners would value an entire ore deposit based on one amazingly rich piece of rock: “I little knew then, that the custom was to hunt out the richest piece of rock and get it assayed! Very often that piece was the size of a filbert, was the only fragment in a ton that had a particle of metal in it—and yet the assay made it pretend to represent the average value of the tons of rubbish it came from.”
Even today, people who are buying or selling claims, or prospectors getting the cart ahead of the horse, will attempt to base a placer or hardrock deposit on one rich assay or one great test pan.
Research
 information, and many of these files were written by geologists giving specific details about individual mines and an overall summary of the district. In these files, geologists describe the geology, ore grade, tonnage and past production. Knowing these fine points of information can lead a prospector in the right direction in the field. Many times, the deposit type or geological model is mentioned in the files and this is important, too, giving certain clues of what to search for in the way of structures, alteration halos and specific rock types associated with the veins or mineral deposit. It is important to have a good understanding of geological models in this type of prospecting.
Mine maps can be found in these files as well. On these maps one can find old stopes or mapped veins with assay numbers along the entire vein. The mine and stope maps can show where high grade ores were found, and with a little extra attention, one can pinpoint where a rich ore body underground might translate to the surface above.
Always exercise caution when digging above an old stope, as breaking through can have dangerous consequences.
Detailed maps of veins with the assays are advantageous because part of the potential sampling work has already been done for you. However, the downside is that mines that have been mapped are fairly large and well known, and it is likely others have beaten you to it.
Tools
Items needed for sampling are basic, but extensive. These include:1) A gold pan for testing samples (which often gives a more realistic recoverable amount than a standard fire assay if the given deposit has visible free gold and gravity will be the method of recovery)
2) Fire assays
 3) Mortar and pestle (for crushing samples)
4) Classifying screens
5) Large zip lock bags or small fabric ore sacks
6) Index cards and a pen (to record sample location and details to be placed in each bag)
7) Rock hammer
8) GPS (for exact coordinates)
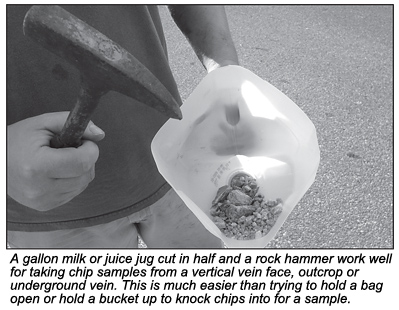
9) Plastic one-gallon milk or juice container cut in half (for chip vein sampling underground or along a vertical vein face)
10) Compass for noting the strike direction of a vein
11) Tape measure for noting width of a vein or outcrop
12) At least a 10X loupe for doing a visual analysis of a sample
A camera can also be handy as pictures of significant features in the field can be viewed later as a reference.
Fieldwork
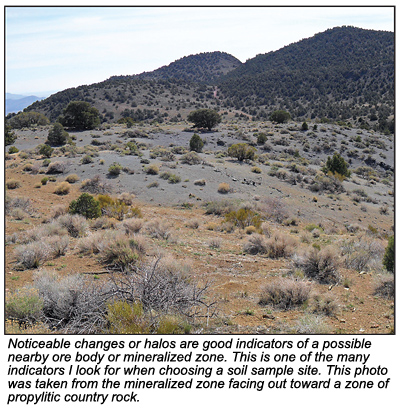
There are many types of samples one can collect in the field. I am going to cover just a few that I have found helpful when out prospecting and trying to narrow down a potential ore body or vein that is worth further investigation. Again, the point of field work is not to find the richest rock for assay but to find a good average grade through several samples.Soil Samples
Soil sampling is a bit like the Australian art of “loaming.” Loaming is a method of tracing elluvial gold to its source by following the increasing amounts of gold in soils by testing.One can grid an area and take a series of documented soil samples through trenching and have them tested in a lab for gold content and other elevated trace elements associated with gold deposits like antimony, arsenic and mercury. Simple pan samples work really well if the given deposit has visible free gold. Fire assays can also be considered with soil samples.When I set out to do soil sampling in an area, I am usually trying to home in on the enriched area of an eroded vein that is hidden below the surface or not boldly cropping out. This type of soil sampling is much like loaming. I was always taught to gather soil samples from at least 12 to 18 inches down, but I have met others who sample 2 to 3 feet in depth if the ground will allow it. I try to dedicate one day to soil sampling and take at least three gallons of classified material per site to see if the site warrants further investigation.
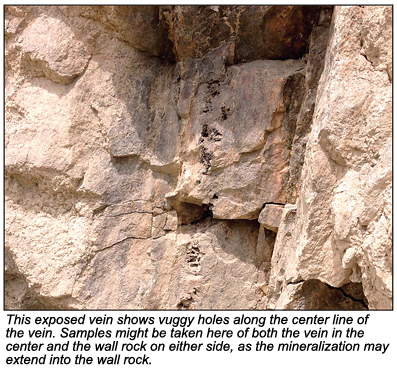
Chip or Channel Samples
To do a chip sample, I use a plastic one-gallon milk jug cut in half. I discard the bottom and use the handle and spout portion (with the lid on) holding the handle and holding the plastic jug flush with the vein. I take my rock hammer and start breaking off small chips of the vein, allowing them to fall into the jug. I move my container
 across the width of the vein in a linear fashion, collecting chips and pieces as I go. The chips will be placed in a bag and a card is filled out with coordinates and a description of the material.
I will also take chips on both sides of the wall rock and any seams adjacent the vein. I place these into separate bags and label them as well.
Mineralization can be found occasionally outside the vein itself, especially if the wall rock is porous or soft. On veins wider than 24 inches, I like to do chip samples in 3- or 4-inch linear sections along the vein. I will take a section from the footwall and chip pieces 3 or 4 inches inside of the vein. I will repeat this along the hanging wall side of the vein and a similar portion in the center of the vein. Each sample from the three spots in the vein needs to be in a separate bag and documented.
Sampling these different portions of a wider vein can help determine if the mineralization lies in the hanging wall, footwall or center. If a vein is exposed or if there is an outcropping for a distance, I try to take chip samples every 10 to 20 feet along the strike. While doing this type of sampling, I take note of the strike and dip of the vein with each sample and measure the strike of the vein with a simple compass or GPS.
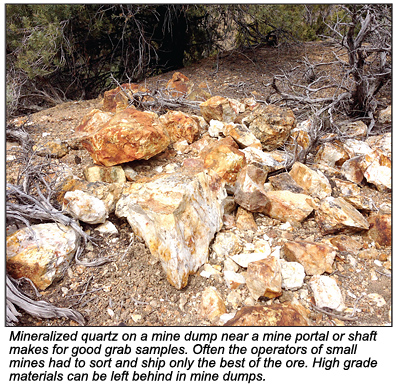
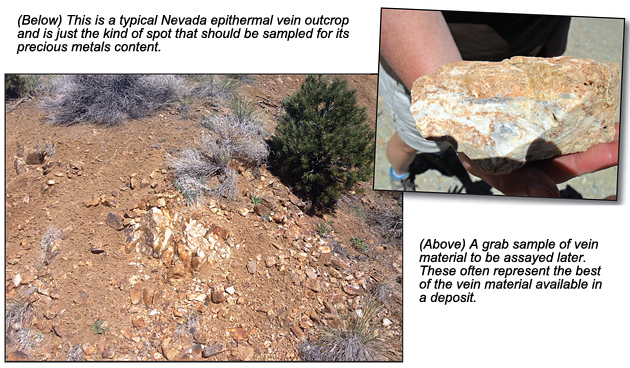
Grab Samples
While still in the field, I find it useful to take pictures along the vein or outcrop and even a few pictures of the host rock just so I have a visual reference for later research. Back at home, I take pictures of the grab samples before they are crushed or sent off for assay so I have a visual reference to go back to after the sample has been processed.
What’s Next?
 be pricey, but well worth it in the long run if larger production or discovery of a commercial deposit is your goal.
If the deposit is known for carrying free-milling, visible gold and the recovery method of values will be through gravity, simple pan testing of samples may be more than sufficient. The documented grab and chip samples need to be crushed and screened as individual samples and then gently panned. Be sure to record the results of each sample. Soil samples can also be panned.
Once you compile all the data from your assays, analysis or pan samples, you will most likely know if the deposit is worth further investigation or if a particular portion of a vein should be your focus. I like to write the results on the back of the corresponding index card from the original sample field notes. When time permits, I log them into a spreadsheet at home.
The front of a grab bag sample looks like this:
Grab Sample #1
District: Santa Rosa
Claim: Monarch II
Coord: 36 10’15”N 118 08’41”W
Vein width & description: Float rock
Strike: N/A Dip: N/A
Description: colloform banded quartz-adularia, minor iron staining, with host andesite attached
The back of the same card looks like this:
Sample weight: 3.92
Sample Size: 3.0x2.5
Assay gpt: 18.73 Au, 29.22 Ag
Assay Lab: **********
This is how I fill out a chip sample card:
District: Sanford
Claim: Golden Boy
Coord: 40 27’54.45”N 106 40’ 27.28” W
Vein width and description: 3’8” stockworks and brecciation
Strike: N30E Dip: Steeply E
Sample Type: Chip Sample #1
Description: Quartz heavily stained by manganese and limonite, some visible gold through loupe
And the back of the chip sample card:
Sample weight: 22.7 oz
Sample size: N/A
Assay: Crushed to -30 and panned, roughly 45 specs of gold around 200 mesh; 2 pieces roughly 80 mesh
And last but not least, the front of a soil sample card:
District: Pete
Claim: N/A
Coord: 36 58’37.97”N 121 53’58.72”W
Sample depth: 19 inches
Description: Bleached soil close to bordering a zone of propylitically altered andesite
And the back:
Sample Weight: 52 oz
Sample Size: 1 pan full
Classified to -12 and panned
Results: 6 pieces of gold minus -150 from 1 pan of material
Soil analysis: Au .003 ppm; Ag 0.4 ppm; As 3. ppm; Hg .19 ppm; Sb 5. ppm; Pb 12. ppm; Cu 14. ppm; Zn 7. ppm
Lab: **************
As a prospector looking to mine a claim on a small scale with gravity equipment, several soil analysis tests may be totally unnecessary as this cost could be better spent elsewhere. Simple panning and a few vein channel assays are probably enough. If you are looking to discover a larger, commercial ore body to potentially exploit through sale or lease, take many methodical samples and use your soil analysis to show potential minable ore bodies on your claim. Use assays of the veins to show prospective investors, buyers or lessors that your property is worth looking into for larger development and capital.
These are just a few of the methods I was taught and still use today when prospecting for hardrock. There are many other methods and variants available for this type of prospecting as well.
This is my favorite type of prospecting. I know some find it tedious, but I got hooked on hardrock prospecting when I was young and will continue to hunt hardrock as long as I am able to scamper up and down the mountainsides in the search for gold and silver.
_______________
References
Twain, Mark, Roughing It, 1872.
Mining Journal Receives Honor
For the 20th consecutive year, ICMJ’s Prospecting and Mining Journal was voted “Prospecting Magazine of the Year”...
Northwestern Alaska Mineral Resources
 Gold and jade are actually only minor mineral resources for the Northwestern Alaska region as a whole. Modern prospecting has focused more on base metal than precious metal resources.
Roads to Nowhere
What today appears to be a “road to nowhere” was once a road to somewhere. At today’s precious metal prices that somewhere can be of great importance to you.
Crushing Quartz in Calaveras County: A Placer Miner Learns New Tricks
I had never run an impact mill before, but anything involving rocks, water and a big electric motor sounded great.
A Few Methods for Sampling Hardrock Deposits
 With a little homework and a methodical approach to sampling, a prospector can determine if a deposit is worthy of more of an investment...
Trying Out the New Highbanker
 The 2011 gold season had finally got underway on the Middle Fork of the Feather River near Quincy, California. Cold weather and high water had pushed gold mining into mid-summer, but things were looking up.
Hidden Value in Old Tailings
The 15 rare earth elements were discovered long after the gold rush began to wane, but demand for them only took off over the past 10 years...
Subscription Required:
The Bawl Mill
• Ask the Experts
• Ask the Experts
• Ask the Experts
• Ask the Experts
• Ask the Experts
• Ask the Experts
• Finding Gold with a VLF Detector—Part III
• Silver and Base Metal Deposits of the Pioche District
• California Dredgers: A Step Closer to Getting Back in the Water
• Arizona's Youngest...and Oldest Prospector
• Exploring Placers with Auger Drills
• Melman on Gold & Silver
• Mining Stock Quotes and Mineral & Metal Prices
• Correction
• Crushing Quartz in Calaveras County: A Placer Miner Learns New Tricks
Free:
Legislative and Regulatory Update
• Protecting Our Access to Public Lands