All Articles
Understanding Sampling Techniques
December 2005 by Chris Ralph
There are a lot of differences between the operations of successful mining companies and ones that become financial failures, but one of the consistent key differences between them is their sampling programs. One is reminded of the old saying about the three most important things to remember about investing in real estate—they are location, location, and location. For mining it is similar, and perhaps the three most important things in designing a successful mining project are sampling, sampling, sampling.
No mineral deposit is uniformly rich; in fact, most are extremely variable. If the property is a good one, some spots may be rich; some will be lower grade but still rich enough to be profitable; but many will be too 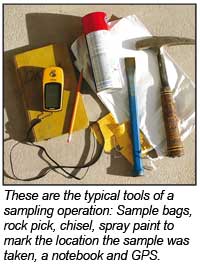 low-grade to work profitably. When rock is too low-grade to make money, it is waste and should not be processed. Large operators spend huge amounts of money on sampling. They have a good idea before mining begins how much waste and how much ore they have. Successful mining companies know that the investment necessary for a good sampling program is well worth the time and dollars expended. Far too often small operators, in a mistaken attempt to reduce costs, conduct little or no sampling before beginning to mine.
I cannot tell you how many times I have been told things like, “We can’t afford the costs and delays of waiting to sample,” or, “Old Tom worked this place in the 30s and he told us it was rich,” or, “We know it’s rich, so there is no need to sample.”
I knew one guy who told me exactly that—I know it’s rich, so there is no need to sample. He sold his house in the Bay Area of California for around $300,000 in the mid-1980s and invested it all in some quality used mining equipment. He bought a used dozer, front-end loader, a smaller dump truck and a nice Gardener-Denver placer plant. Then he and his two sons spent 3 months working that really “rich” property—the exact same one he told me was so rich he didn’t need to sample. Want to know his total take for three months commercial-scale mining? He got only three ounces of gold—mostly fines. That was not even enough to pay for the fuel he consumed, let alone any wages for him and his sons. He lost his shirt in his placer mining venture. A similar fate happens to commercial mining operations that don’t do their sampling “homework” beforehand.
If you are running a commercial operation and your total operating costs are $10 per yard to process gravel, how much $3 gravel should you process? None—because you are losing $7 per yard! How much $50 gravel should you process? As much as possible! Unfortunately, without good sampling you have no idea what it is you are putting in the hopper. Is it $50 material or $3 material? You might have some kind of guess, but who really knows if you don’t have samples! You will find out eventually, but if you ran money-losing rock the money will be already gone before you find out!
Concepts of Sampling
Designing a sampling program. Probably the first thing one needs to determine is what the goal of your sampling program is. Mark Twain tells a funny story of miners seeking to sell their property who would search for hours to find some small piece of ore that was high grade. That tiny fragment, perhaps the size of a walnut, would be taken in for assaying. The results would show extremely rich ore, with perhaps hundreds of ounces of silver and many ounces of gold per ton. In selling his claim, the miner would use the assay as if that 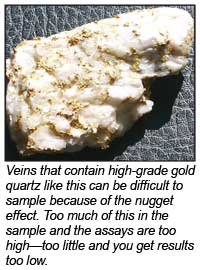 reflected the average grade of all the rock the mine produced, even though there might not be even half a pound of that type of rock in 100 tons of ore. That’s how Twain got his saying that the definition of a mine was “a hole in the ground with a liar standing next to it.”
Using poorly planned sampling methods is a technique guaranteed to give poor results. When beginning a sampling project, it’s important to plan what you are doing in advance. When designing a sampling program the first thing that has to be considered is: What are you trying to determine? Are you exploring for new deposits or trying to characterize the average grade of a known vein or other deposit?
The goals of a prospecting or exploration sampling program are not the same as the goals in ore characterization sampling.
In prospecting or exploration, one is looking for ore deposits—concentrations of mineralization that would be worthy of further investigation. In an exploration project, the miner is looking to find new ore bodies, paystreaks or patches of nuggets. The goal in this type of operation is to identify likely locations for deposits and prospect there to see if some valuable deposits can be found.
In sampling, one is taking a more or less known deposit and testing it to characterize the extent and grade of deposit, determine its size, typical grade and other characteristics. This is usually done when considering a commercial mining operation in order to make an economic analysis or feasibility study to determine if it is economic to mine that deposit. It is important to recognize that most of the gravel in many placer mines is waste (the same is true for vein rock in most hard rock mines). When you are prospecting, you are searching for the valuable parts of those deposits, while in sampling, you are deciding the typical grade and size—what is ore and what is not.
Nugget effect. Designing a good sampling program requires an understanding of the deposit itself.
The famous “nugget effect” occurs when a sample includes a nugget or other piece of high-grade material, giving an overall value much higher than the true average. Some deposits are like chocolate chip cookies with a few “chips” of high grade spread thinly through the “dough” of the whole deposit. Many placers tend to be like this and as a result these types of deposits are very difficult to sample as you will get a few samples with very high values where the good stuff was included, and many more that are very low grade where the high grade was not included in the assay. Larger volume bulk samples and a combination of both the high and the low results need to be considered to give a true average. There are hard rock deposits with characteristics like this, and they are among the most difficult to sample properly. Dealing with these kinds of deposits require a good understanding of the size and dispersion of the mineralization.
Sampling Placers. Sampling of placers is difficult, as placer deposits are typically stratified with increased concentration of values in layers, especially on bedrock. Often the paying layer of bedrock may extend one or more feet into bedrock because of crevices. If the placer values are coarse in size, the nugget effect can be especially bad, making the determination of a true average extremely difficult. Checking placers by fire assay 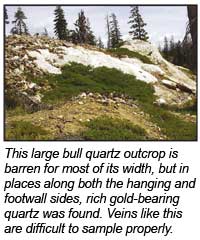 almost always gives misleading (higher than expected) results as the fire assay captures gold within fragments of quartz and other mineralization that normal placer operations simply cannot recover. Good placer sampling requires larger-sized bulk samples and accurate collection of materials from the bedrock or other paying strata such as false bedrock or flood layers. It is also much better to test a placer using recovery methods similar to those that will likely be used when the deposit is mined.
Sampling mine dumps. Sometimes old dumps contain enough mineralization that they can be economically mined and processed using updated methods. Special techniques, which consider the layered structure of mine dumps, must be used since mine dumps are created in a way far different from natural hardrock deposits. Channels cut across the surface of the dump need to be arranged perpendicular to the layers of the dump—a direction that is usually parallel to the haulage track on which the dump was built.
Sampling hardrock. Effective hardrock orebody sampling requires some understanding of the structure of the ore deposit. Sometimes this can be difficult when the geologist is considering a new deposit—what direction does the deposit go? Some deposits have sharp contacts with the country rock, and some just slowly grade from ore into waste. Different techniques are required for surface or sub-surface deposits. In drilling, the angle and depth of the sample are designed to go (as much as possible) across the structure of the deposit so that a true sample across the deposit can be obtained. In sampling hardrock deposits, there are a number of types of samples a geologist might take.
Grab samples are samples of rock material from a small area, often just a few pieces or even a single piece of rock “grabbed” from a face, dump or outcrop. These are the most common types of samples collected when surveying an area or beginning exploration for hardrock deposits in the field. The sample usually consists of material that is taken to be representative of a specific type of rock or mineralization. It is more associated with exploration programs.
Composite chip samples consist of a series of small chips collected over a larger area. The sample source may be a line or a grid laid out on the face of an exposed outcrop. Composite samples are normally taken from similar sorts of material but are specifically intended as representative samples, so the balance of the material they represent is taken into consideration. The procedure is to collect small chips and pieces of rock over a large area to make the sample as representative of the material as a whole as is possible. A composite sample is typically collected to determine the average grade of the mineralization present. If the area covered is too large, the information as to what is present (i.e., small high-grade portions) will be lost to the averaging effect of this sample method.
High-grade samples are more like the type of samples Mark Twain mentioned. A high-grade sample consists of selected pieces of the most highly mineralized material, specifically excluding any less mineralized rock. As a result, a high-grade sample is not representative of the overall mineralization found at that location. A high-grade sample might be collected to get an idea of what the richest possible values are, or to provide material for certain types of trace element analyses. If a very selective sample like this does not return the expected high-grade results, then it is unlikely that a significant amount of valuable mineralization is present, so it is sometimes used as a “worst case” type of test. When a high-grade sample is collected it is important to label it as a high-grade sample, so its values will not be misinterpreted as representing the “average” values of a deposit.
Channel samples consist of small chips of rock collected over a specified linear interval. Channel sampling is used for veins and other structures exposed on the surface. The objective is to cut a linear channel across the vein or orebody in order to obtain the most representative sample possible for the designated interval. Most of the time, chip channel samples are collected in succession along a sample line that is laid out in advance using a tape measure, and is designed to parallel the true width of the deposit. Often the chip channel samples are collected along surface trenches or the floors or walls of various underground workings.
When chip channel sampling is conducted along a rock face, often a piece of canvas or plastic is laid out for the material to fall on so as to avoid contamination and make the collection of the sample easier. Sample intervals are set at a specified width, usually ranging from 1 to 20 feet, commonly 5 feet. Similarly, with rotary drilling, the geologist can capture a certain length of the chips collected along a drill hole length, and produce a composited chip sample out of a drill hole.
A century ago, prospectors in the field sampled hardrock deposits by crushing any suspected ore and carefully panning out the heavy materials, hopefully including gold.
Pan sampling was utilized by the old timers to test veins and other deposits by collecting a sample, crushing it to fine sand, and carefully panning the results to see what heavy minerals, such as gold, remain. With 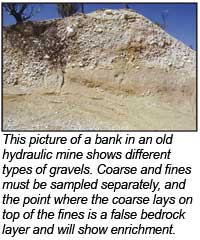 experience, the old timers learned to correlate the amount of color they saw in a pan full of crushed vein material with the approximate ounces per ton reading one would get from a normal fire assay. A very large percentage of the hardrock gold mines across the world were originally discovered using some variation of this method, especially in combination with techniques for pocket tracing (the method for following placer fragments up a drainage to its source). Many small mines were run for years based mostly on “panned” assays of channel samples. The advantage of this method is that it is cheap and quick, and it gives a good evaluation of coarse free gold, but also shows up any sulfides or other heavy metallic minerals. Because sample results are there to see in only a few minutes, many samples can be taken and many veins can be tested in a short period. The disadvantage to this type of analysis is that it won’t capture extremely fine gold or any gold tied up in sulfides or tellurides. Sometimes crushed sulfides are hard to recognize and rich tellurides are hard to distinguish from things like pyrite. Some very rich deposits (including those at the Carlin Trend in Nevada) have only very fine gold, which cannot be panned by this method. The other part of this method is that you still need to take multiple samples to really characterize the vein. You can’t determine the whole story from one pan because even if you get a pennyweight of gold in one pan, you won’t know what is typical until you have taken a few pans.
Geochemical sampling involves collecting and analyzing things like soils, stream sediments and rocks, and testing for certain chemical elements that are associated with valuable mineral deposits. These methods are extremely efficient exploration tools and a few well-located sediment samples can be used to test vast areas for potential mineral deposits. The presence of these trace elements can be nearly impossible to recognize in a hand specimen, but lab analysis by methods such as Atomic Absorption (AA) can reveal elevated levels that are only in the parts per million range. Many well-known ore deposits were discovered using these methods.
Geochemical sampling works because it is fairly normal that large hardrock gold and silver deposits have a surrounding envelope of weak mineralization, also known as a dispersion halo. They are formed by “leakage” of mineralizing fluids into the surrounding rocks, and are best developed around large bulk-type deposits and those deposits that form in rocks that are porous enough to allow for fluid flow. These halo areas have elevated concentrations of metals commonly found in association with gold deposits. The concentrations are low, but significantly higher than the normal background levels found in unmineralized rock. A variety of elements can be analyzed, typically focusing on expected elements that commonly associate with known deposits. As an example, typical elevated elements that may be found around epithermal gold or silver deposits include mercury, antimony and arsenic. Knowledge of these pathfinder elements and which elements are associated with certain types of deposits is critical for interpreting geochemical test results.
Even after the discovery of a possible new deposit, geochemical sampling is important in delineating the areas of mineralization. For example, geochemical sampling of soils is often employed to outline the general area of mineralization at shallow depths where outcrops of bedrock are minimal or nonexistent. This can then be used in designing drilling programs. Sample results for certain elements are often plotted on a map to locate regions of elevated concentration.
The Individual Prospector
What does all this mean to the small operator or weekend prospector? The miner needs to know the difference between exploring and mining, and that exploring always comes first. Explore and prospect around to find the 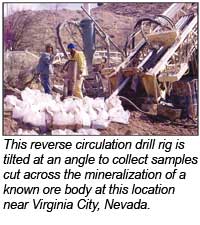 best part of your claim. Few small operators spend enough time prospecting and sampling—they want to move too quickly to mining. The best paystreaks are not always exactly where you expect to find them. For example, if you are dredging, punch a few holes around to see where bedrock is, what flood layers are present, how deep the bedrock is, etc. If you don’t find good gold, move on and prospect further—keep exploring.
Far too many simply find a likely spot and start working down to bedrock. Once they hit bedrock, if there’s not much there, they just spread the hole in an attempt to find something. It would be much better to move up or down stream a ways, and then punch another hole.
The message to the individual is to explore and prospect to find a valuable deposit first, then sample to determine its extent and value second, then mine it third! The most successful individual prospectors think like snipers, prospecting to find a paying deposit first. Depending on your situation, it might even be best to evaluate a property with a pan and crevice tools first to determine the best place to bring in a dredge. When you do bring the dredge, punch a few holes to see how far the paystreak extends. Start dredging seriously for production at the lower end of that paystreak and mine upstream so you don’t dump your tailings on top of the unmined part of the paystreak. Don’t start out mining; start out prospecting, then go to sampling, and finally on to mining.
Exploration sampling and prospecting can be the most difficult part of an operation for small operators and individuals, but when done correctly, it will have the most rewarding results.![]()
Melman on Gold & Silver
We have been concerned for some time about the growing roster of laws, rules and regulations under which the entire industrial complex must operate…
Buying a Used Gold Dredge
 In March of 2001, I saw a 3” dredge for sale on the Internet that was way over priced. It was advertised as a “complete Keene 3 inch gold dredge ready to go.” But what I saw was only an old 3” Keene header-style sluice box with home made...
Quit While You’re Goin’ Good
 Then I came to a section of recently exposed gravel that looked unworked. Water seeped out all around, making the ground beneath a sea of slick mud.
What's All This Talk About Mining Districts?
The main problem with the current scheme is that regulatory agencies often consult with you, then disregard your concerns and do what they want anyway.
Understanding Hard Rock Mining: Terms and Methods—Part I
While most small-scale prospectors and miners focus their energies on placer deposits, most large mining companies put their efforts primarily into hard rock mining. Although many miners may see these as two separate worlds that can never meet, a better understanding of hard rock mining for small operators can be very helpful in many ways.
PLP Update
 We are happy to report that the current administration has issued a directive to the Forest Service and BLM to address this concern…
Subscription Required:
The Bawl Mill
• Pombo Bill to Provide Some Relief for Miners
• Gemstones in Wyoming—Part I
• Gateway Gold and Jerritt Canyon
• The Koyukuk-Nolan Goldfields
• Miners Come Out On Top in SREP v. USFS
• Mining Stock Quotes and Mineral & Metal Prices
• Melman on Gold & Silver
• Looking Back
• Company Notes
• Adding Shine to Your Portfolio
• Picks & Pans: Nuggetshooting Around Cactus
• Tales of California Gold Discoveries 4th in a Series—Pay Attention When You Dig


