Sluicing Instructions
 STEP 1: GETTING SET UP STEP 1: GETTING SET UPAfter you have located a promising deposit of gold-bearing gravel, walk along the stream bank and look for a place where you can set up your sluice box. You should search for a spot where the current is moving quite swiftly. Once you find such a place, set your sluice box directly in the current so that the box is filled with water almost to the top.You can often compensate by placing the sluice box so that the upper "input" end is slightly higher than the lower "discharge" end. If the sluice box is somewhat unstable in the current, position a few rocks around the outside of the trough to brace it.
|
|||
 |
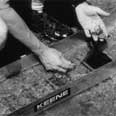
STEP 2: FEEDING THE SLUICE Feed your gold-bearing gravel into the upper portion of the sluice box in carefully regulated amounts. Do not, under any circumstances, dump a large amount of gravel into the sluice box all at once! The gravel must be fed at a pace that will not overload the riffles. How can you tell when the riffles are overloading? It is simple: if you cannot see the uppermost "crest" of each riffle bar at all times, you are feeding the gravel too fast. Back off a bit. |
 |
The use of a 1/4 inch classifier screen to pre-screen material before dumping into the sluice box can save much time and effort. The penalty for overloading your riffles often results in lost gold! Each time a new load of gravel is dumped into a sluice box with overloaded riffles, any gold in that gravel will wash right over the material that is clogging your riffles and out the discharge end of the box. |
 |
STEP 3: CHECK THE SLUICE FOR VALUES It is a good idea to periodically check the sluice box for values that may have been recovered. The black rubber matting is designed to make a quick inspection during the sluice operation. Gold can be spotted instantly on the black matting while the sluice is being fed. This helps to determine where the gold values may be the most plentiful. Remember, don't overload your riffles! |
 |
STEP 4: TENDING THE SLUICE After dumping each load of gravel into the sluice box, check the riffle section for large waste rocks that may be lodged in the sluice. Flick these rocks out of the riffles with your fingers. When large rocks are allowed to rest in the riffle section they will cause the current to wash out all the concentrates from the immediate area of the rock. |
 |
If a rock is lodged in the uppermost portion of the trough, the washed out concentrates will merely settle in the next few riffles down. But if the wash-out occurs at the lower end of the trough, the concentrate may flow out of the sluice box altogether. |  |
As one can see, it pays to keep an eye on those waste rocks! And one more thing, don't forget to shovel away the tailings which will periodically build up at the discharge end of the sluice box. If you don't, the tailings will back up into the lower end of the sluice trough, burying some of your riffles. |
 |
STEP 5: PERFORMING THE CLEANUP When your riffles have accumulated black iron sand in amounts extending more than halfway downward to the next lower riffle, it is time to perform a cleanup. Carefully lift the sluice box from the current keeping it as level as possible. Now carry it over to the stream bank (watch your footing on those slippery rocks!) and set it down. |
 |
Remove the sluice's riffle section and screen and set it aside, exercising care not to shake off any gravel adhering to it. Roll up the matting which lines the bottom of the sluice box trough and thoroughly rinse off all the concentrate. This should be done with the matting safely contained in a gold pan or deep bucket if possible. The use of a bucket may prevent any loss of all gold that could occur when attempting to rinse out the matting in a gold pan! Next, examine the empty sluice box trough. Gold has a tendency to work its way beneath the matting which often lies at the bottom of the trough. You may be surprised at the amount of "color" that can accumulate there. |
Check to see if there is any fine silt clinging to the bottom, rinse all of it into your concentrate bucket. Finally, pick up the riffle section itself and rinse any adhering gravel into the concentrate bucket. The sluice box cannot be considered "cleaned" until each and every part has been thoroughly rinsed.
 |
STEP 6: GETTING THE GOLD OUT And now for the final step. This is the one you will certainly enjoy the most. The act of panning out your concentrates to get the gold. I hope your run was a profitable one! SUMMING UP By the time you get to Step Six, you will have processed several hundred pounds of gravel, far more than the average person could ever hope to hand-pan during a daily outing. Using a sluice box of the type shown, you, too, can work this much gravel! All you need is a sturdy shovel, a couple of good buckets to carry gravel to the creek, and if you're fortunate, a mining partner to feed the sluice box while you dig gravel, and a solid desire to get that gold! Happy sluicing! |