All Articles
Free
The Jenkins Mine Project Pt III -- Site Selection
October 2010 by David
“Gold is where you find it.” This is one of the most common phrases spoken in regard to gold prospecting. Well of course gold is where you find it, but where is the “correct” place to look?
Picking a spot to work is probably one of the most frustrating decisions a prospector is faced with. Gold hounds can spend an entire weekend working in one specific spot knowing that the results could be totally different a few feet away. This notion is sadly known to many of us when a fellow prospector jumps into an old hole and hits great color just a few feet away.
I still consider myself a prospecting novice—I have less than four years of gold-finding experience. Even so, I can’t help but wonder if the old salts ask themselves the same questions. Where is the best place to dig? Where is the ancient stream channel? How much has this channel moved, and where are the ancient high and low pressure areas?
If you’ve read the August and September “Jenkins Mine Project” articles, you will recall that I started this project because I was tired of bouncing around from spot to spot on Virginia’s Contrary Creek. Even though I was finding gold, I knew there had to be some kind of physics or science that I could incorporate that would increase my odds of having better recoveries. You will also recall that I slept through most of my science and geology classes, and I’m pretty much useless at math without a calculator!
Understanding and accepting weaknesses is part of reality, but so is working hard to improve those areas. With no formal schooling in science or geology, I set out on this project as a total amateur in all aspects of the adventure. Picture a little league baseball player standing on the pitchers mound in Yankee Stadium and facing Mickey Mantle at the plate. That’s me (the little leaguer). I practically felt foolish walking through the woods with my GPS, maps, and notebook. What do I look for? What do I write down? I reminded myself of the project goals that I wrote down at the onset of the project:
- Initiate a gold prospecting project based on detailed analysis, terrain studies, map research, and on-site observations.
- Select an area based on the results of the studies.
- Within the selected area, pick a specific stretch of creek to work. Work the entire water channel with no bias towards recovery results.
- Document every session. Include hours, temperatures, water flow, recovery, equipment, and characteristics of materials to include composition of overburden, flood layers, clay, and bedrock.
- Prepare detailed reports on each session to include plotting each session on a map. Record and plot all significant pieces of gold, and use the plots to establish a pay streak if one is present.
- Complete the project in 24 months.
- Share the results with others.
This feeling of complete helplessness started to subside when I took the time to walk the property, study the terrain and maps, and write everything down.
After observing the incredible flood that occurred in April 2008, I was able to make some amateur sense of the evidence I was finding up on the banks and along the tree lines. I climbed up into the biggest trees to get birds-eye views of the creek.
I spent months breaking brush and pulling thorns out of my shins, and my legs looked like they had been used to separate a fight between two mountain lions. I was finally ready to dig test holes.
Contrary Creek, located in Mineral, Virginia, is only a few miles long. The creek drains into man-made Lake Anna. There is a private gold prospecting lease on the last mile of the creek, and this is where the project was to take place.
I started at the top of the lease and worked my way down, over a mile, towards the lake. Before testing began, I vowed not to take too much time in each location, and no matter what the results were, I was to keep moving downstream and continue testing.
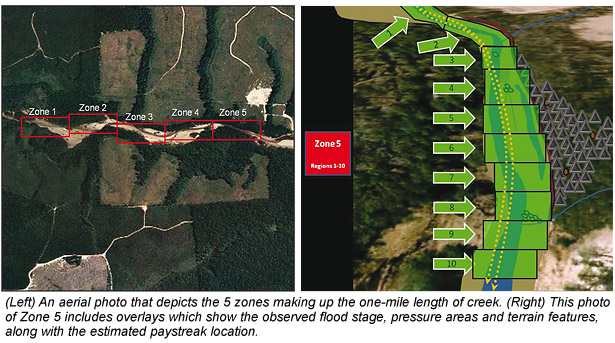
I began my testing project by first dividing my one-mile “master map” into 5 consecutive zones. Zone 1 was at the upstream boundary of the lease, and Zone 5 was at the bottom by the lake. Each zone was broken down into 10 Regions. Testing included working both in and out of the current stream channel. I used pans and classifiers, stream sluices, high bankers, and dredges.
I did not want to limit each test based on the size of the hole because I did not know how deep these areas were. Instead, I limited myself to 2 hours of work at each site. Two hours was enough time to gather enough material for further evaluation. Gravels were screened down to 8-, 12- and 20-mesh, on site. All -20 materials were taken home and further screened down to -30 and -50.
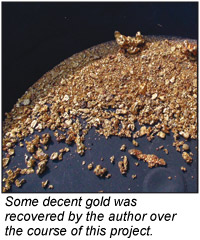
Each sample was carefully evaluated by slow panning, and then recorded. This sampling program was painfully tedious, and I’ve still got the calluses and embedded shovel splinters to prove it. But completing that testing program validated certain areas of the creek and eliminated others. This helped narrow down the locations for the project.
With my goals in mind, and having completed what I considered to be a detailed 4-month amateur analysis of the entire creek, my choices were narrowed down to three locations. Each location had pros and cons, and all three had excellent testing results.
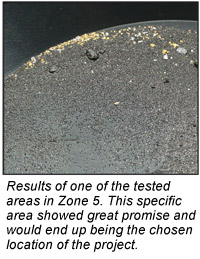
I chose Zone 5 with specific targets of Regions 2-6. This was about 250 feet of creek, and these specific regions within this zone met every criteria set during the analysis, mapping, and testing phases of the project. Two other locations also met the same exact criteria, but I ended up choosing this one for a few reasons.
This location was at the very bottom of the creek and ensured I would not be covering massive lengths of potentially rich virgin ground with a year’s worth of tails. Next, I figured that gold deposition would be of a higher concentration if I was below all of the gold-bearing feeder streams.
These regions were also directly downstream of one of the only sharp bends in the entire creek. There were obvious low pressure bars after the bend, and definitely signs of material deposition with a drastic change in water speed, direction, and pressure.
Finally, this location was at the very bottom of the lease. I felt I could conduct the project without being worried about another prospector coming in and potentially skewing the results of some intense recovery documentation, which I’ll discuss in my conclusion next issue.
I was finally ready to move my equipment to the location and start moving material. With less than a week before starting, I experienced some delays due to requirements at work—the job that pays the bills. I was so excited about starting the project that I began to dream up excuses to take a month of leave. I know most of you can relate to this excitement. Calmer heads prevailed (wife), and I started recovery operations in early September.
Autumn was slowly setting in, and golden leaves had already begun their descent from the circling breezes into the calm pools on the creek. Recovery operations were about to commence, and I was ready to put all my hard research to the test.
© ICMJ's Prospecting and Mining Journal, CMJ Inc.